Computer Forensics for File Recovery
 https://edgy.app/wp-content/uploads/2018/04/dataleakhackerGorodenkoff-970x546.jpg
Introduction
When a file is “deleted”, its contents aren’t typically erased from the storage device that it was stored on. More often than not, the blocks that stored the file are marked as unallocated and the filesystem pointers are removed from it. The implication is that the file still exists on the disk until it is overwritten.
There are many methods to recovering the raw, unallocated data. This website lists many tools that can be used for file recovery in different scenarios. In this article, I’ll be walking through 5 different tools that can be used to recover data.
Setup
I’ll be using doing forensic analysis on a drive that I created and attached to my Kali Linux VM. To see how this is done, you can reference this article. On this drive, I saved and then deleted an image file and text file.
 I’ll start by doing general enumeration on the disk image. Then, I’ll showcase a variety of file recovery techniques used by forensic analysts that allowed me to recover the deleted files. Many of the tools used will be from the Sleuth Kit (TSK).
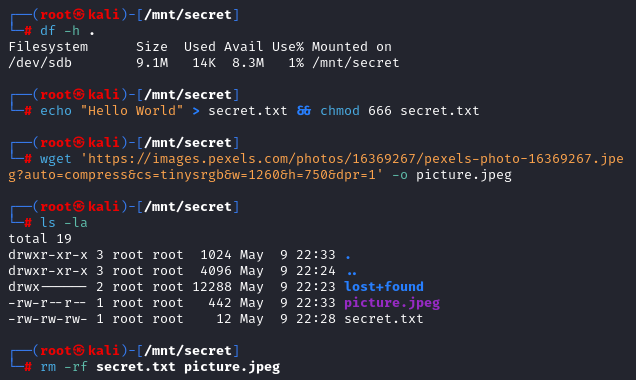
Before starting, I’ll unmount the filesystem, create a duplicate of it, remove write permissions from the duplicate, and verify the integrity of the duplicate against the original hash of /dev/sdb.
$ cd ../ && umount /mnt/secret # unmount /mnt/secret

$ dd if=/dev/sdb of=/home/kali/forensics/sdb.img # copy /dev/sdb into sdb.img
22286+0 records in
22286+0 records out
11410432 bytes (11 MB, 11 MiB) copied, 0.0412053 s, 277 MB/s

$ chmod a-w /home/kali/forensics/sdb.img # remove write access to the image

$ md5sum /home/kali/forensics/sdb.img /dev/sdb
6c49fb21916d59e0df69453959392e23 /home/kali/forensics/sdb.img
6c49fb21916d59e0df69453959392e23 /dev/sdb
Enumeration
Image Analysis
Using the file command reveals that the image uses an ext4 file system.
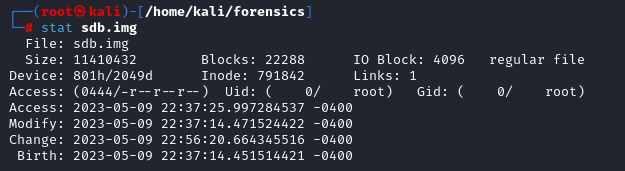
 Furthermore, the
 stat command displays information about the image such as its size, time stamps, and block details.
 With the information that the image uses ext4, the
 fsstat command can be used to extract more detailed information about the file system, metadata, content data, and block groups.
$ fsstat -f ext4 sdb.img
FILE SYSTEM INFORMATION
--------------------------------------------
File System Type: Ext4
Volume Name:
Volume ID: dc8a4fb36dce8eabee4c51cf01c2d52a

Last Written at: 2023-05-09 22:35:31 (EDT)
Last Checked at: 2023-05-09 22:23:26 (EDT)

Last Mounted at: 2023-05-09 22:24:27 (EDT)
Unmounted properly
Last mounted on: /mnt/secret

Source OS: Linux
Dynamic Structure
Compat Features: Journal, Ext Attributes, Resize Inode, Dir Index
InCompat Features: Filetype, Extents, 64bit, Flexible Block Groups,
Read Only Compat Features: Sparse Super, Large File, Huge File, Extra Inode Size

Journal ID: 00
Journal Inode: 8

METADATA INFORMATION
--------------------------------------------
Inode Range: 1 - 2785
Root Directory: 2
Free Inodes: 2773
Inode Size: 256

CONTENT INFORMATION
--------------------------------------------
Block Groups Per Flex Group: 16
Block Range: 0 - 11139
Block Size: 1024
Reserved Blocks Before Block Groups: 1
Free Blocks: 9223

BLOCK GROUP INFORMATION
--------------------------------------------
Number of Block Groups: 2
Inodes per group: 1392
Blocks per group: 8192

Group: 0:
 Block Group Flags: [INODE\_ZEROED]
 Inode Range: 1 - 1392
 Block Range: 1 - 8192
 Layout:
 Super Block: 1 - 1
 Group Descriptor Table: 2 - 2
 Group Descriptor Growth Blocks: 3 - 89
 Data bitmap: 90 - 90
 Inode bitmap: 92 - 92
 Inode Table: 94 - 441
 Uninit Data Bitmaps: 92 - 105
 Uninit Inode Bitmaps: 94 - 107
 Uninit Inode Table: 790 - 5661
 Data Blocks: 5690 - 8192
 Free Inodes: 1381 (99%)
 Free Blocks: 6365 (77%)
 Total Directories: 2
 Stored Checksum: 0x7DEB

Group: 1:
 Block Group Flags: [INODE\_UNINIT, INODE\_ZEROED]
 Inode Range: 1393 - 2784
 Block Range: 8193 - 11139
 Layout:
 Super Block: 8193 - 8193
 Group Descriptor Table: 8194 - 8194
 Group Descriptor Growth Blocks: 8195 - 8281
 Data bitmap: 91 - 91
 Inode bitmap: 93 - 93
 Inode Table: 442 - 789
 Data Blocks: 8282 - 11139
 Free Inodes: 1392 (100%)
 Free Blocks: 2858 (96%)
 Total Directories: 0
 Stored Checksum: 0xDFA7
Based on this output, it is clear that the block size is 1024 bits, there are 1113 total blocks, and there are 2785 inodes.
In addition, parted can be used to find more information on the partition table, which can be useful when using scalpel.
 Finally, running
 strings on the image gives more insight as to what is in the filesystem. It appears that my secret.txt file with the contents Hello World is appearing from the strings command in addition to a failed image download attempt.
 In the command
 strings -a --radix=d sdb.img, -a is an option to scan the entire file and --radix=d tells strings to show the offset that the string was found at in base 10.
Analyzing the Files
This particular image does not have any files currently in it aside from deleted files, so there isn’t much information to gain from mounting it and analyzing the files. In cases where it is desireable to do so, the following command can be used:
$ mount -o ro,loop,noexec,noatime sdb.img
Below, I’ll explain what the options do:
-o: sets the options for mountingsdb.img.- ro: an option to mount the file system as being read-only
- loop: mount the file system on a loop device
- noexec: disallow execution
- noatime: don’t change the access time of the files
You can then continue to run file on the files within the mounted loop device and save their md5 hashes to verify integrity.
Recovering the Files
Method 1: Using Sleuth Kit
Often, if you have deleted files, they may be displayed with fls sdb.img, enumerated with istat -o <offset> sdb.img <inode_number>, and recovered with icat -o <offset> sdb.img <inode_number>. An example of the latter 2 steps are shown in the screenshot below.
 https://www.therootuser.com/wp-content/uploads/2017/11/Screenshot-2017-11-07-17.27.58.png
This does not appear to be the case for me, however. My deleted files are not appearing from the fls command. Instead, I see a variable called $OrphanFiles.

$OrphanFiles are files that still exist in the image, but are no longer able to be accessed from the root directory. $OrphanFiles is not an actual directory on the image, it is Sleuth Kit’s virtual way to demonstrate that the file metadata still exists (read more).
To recover these orphan files, I will attempt a few techniques starting with extundelete.
Method 2: Extundelete
This tool can be used to recover files on ext3 and ext4 filesystems. I was having some difficulties with the build from apt, so I build the program from source with the following commands to it working again:
apt update && apt install -y libext2fs-dev
git clone https://github.com/cherojeong/extundelete.git
./configure
make
src/extundelete --restore-all /path/to/image.img
os << “Directory ACL: “ << inode.i_dir_acl << std::endl; with os << “Directory ACL: “ << inode.i_file_acl << std::endl;.
The command extundelete --restore-all sdb.img can be used to recover files.
 As you can see in the screenshot above, the tool was unsuccessful in recovering the orphan files. This is still a viable option that can work in many scenarios which is why I decided to include it in this article.
I’m not giving up yet. We’ll try again!
Method 3: TestDisk
The .tar.bz file can be downloaded here. I’m using version 7.2. Note that in order for TestDisk to work, you must run it in the download directory. Otherwise you might get an error like *** Error in /path/to/testdisk-7.2-WIP/photorec_static’: malloc(): memory corruption: 0x0000000002617d29 ***`.
# extract and run the file
tar -xf testdisk-7.2-WIP.linux26-x86\_64.tar.bz2
cd testdisk-7.2-WIP
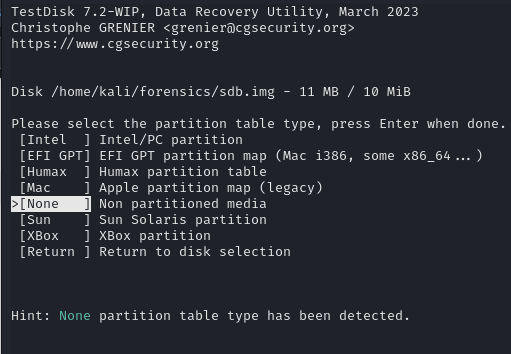
./photorec\_static /path/to/sdb.img /log
A help menu will appear. I’ll first select the image that I want to work with.
 Then, I select the option for the partition table for the media. Mine does not have one, so I choose “None”. I verified that this was the only option that was able to list files for me.
 After this, I navigate to the “List” option at the bottom of the terminal and press
 Enter.
 This leads me to the listing of the files on the image with the successfully recovered ones in red text.
 As you can see in the screenshot, there are no new files there listed in red. This means that
 TestDisk was unsuccessful in recovering the deleted files.
It’s okay, I still got a few more tricks up my sleeve.
Method 4: Foremost
Foremost can be installed with apt.
sudo apt install foremost
This tool uses a technique known as file carving which involves searching through the raw data on a disk and carving out the values between the header and/or footer of the file.
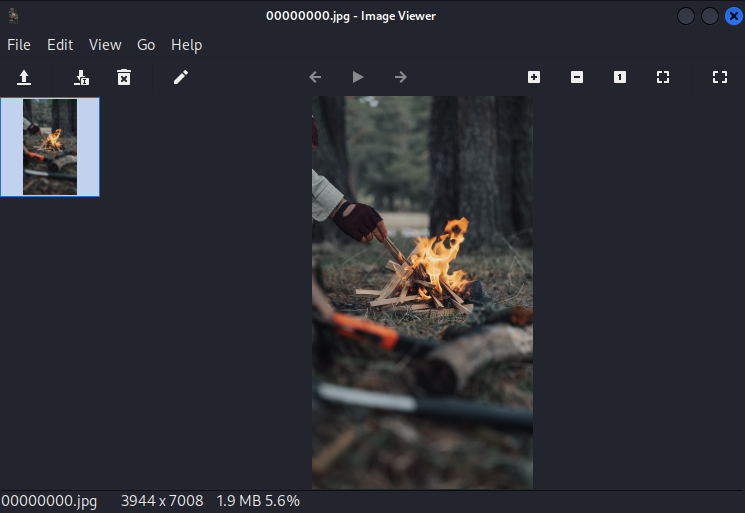
 Alas, we were able to recover a deleted image file from the drive with
 foremost -t jpeg -o recovered-files -i sdb.img. The recovered image renders as expected in the Image Viewer. What a pretty camp fire.
 The fact that this worked while the previous 3 methods did not further demonstrates that different tools and techniques will be more effective at data recovery in different scenarios.
It’s also worth mentioning that you can edit the /etc/foremost.conf file to contain your own custom headers and footers for the file you are looking for. Modifying these values will be explored in the next and final method.
Method 5: Scalpel
Scalpel is much like Foremost with added flexibility. You are not as limited on the file types and headers, although there is a way to modify foremost to have the same customization that scalpel provides.
sudo apt install scalpel
cp /etc/scalpel/scalpel.conf .
vim scalpel.conf
I’ll edit the config with the bit of background information that I have. I know that I’m attempting to recover a JPEG file and I also know that there was a text file that began with the word “Hello”. By using xxd, I can determine the file headers for a .txt file starting with the word “Hello”. In this case, it would be \x48\x65\x6c\x6c\x6f.
$ echo -n Hello | xxd
00000000: 4865 6c6c 6f Hello.
We will use this information to update the scalpel.conf file in vim. As explained in the comments at the top of the config file, the first column indicates the file extension. The second is whether the header and footer are case sensitive, the third is the header in hexadecimal bytes, the fourth column is an optional footer, and the fifth column is an optional parameter to search backwards from the header rather than just forward.
 With these options set,
 scalpel can now be ran to extract these files from the drive.
scalpel -o recovered-files\_scalpel -c scalpel.conf sdb.img
 It appears that the text file was successfully recovered.
 The image was recovered as well.
 Conclusion
There’s many ways to achieve the same outcome. The different tools showcased here have their specific applications where they perform best. Even though not all the methods outlined here worked for my particular situation, that doesn’t mean they won’t work for you. There are many factors that determine whether file recovery will be successful including the partitioning table type, how long it has been since they were deleted, the size of the file (smaller files are more likely to be recovered), the health of the storage device, and the operations that have been done on the drive since deleting the files such as reformatting the drive.
I hope that through reading this article, you were able to deepen your understanding of file recovery and gain practical knowledge that you can apply in the real world. Thanks for reading and I’ll see you next time.