DNS Cache Poisoning on Home Lab Walkthrough
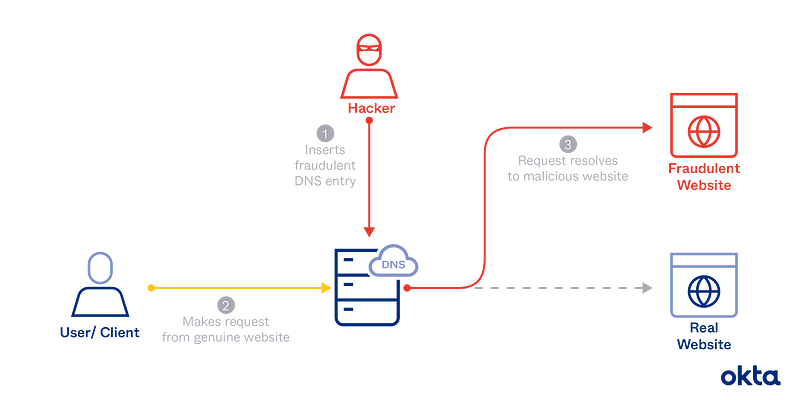 https://www.okta.com/sites/default/files/media/image/2021-04/DNSPoisoning.png
Overview
In this article, I will be walking you through a common method of implementing DNS cache poisoning on a network. I’ll illustrate my process with screenshots, commands, and explanations. You are welcome to follow along and gain hands-on experience with DNS spoofing to further reinforce the knowledge that you already have.
Intended Audience
This is intended for a more technical audience. If you’re a beginner, I recommend looking for a more comprehensive tutorial to walk you through all the terminology and commands. For the purposes of this article, I’m assuming that you already have a foundational understanding of Linux, DNS, virtual machines, and potentially troubleshooting. I will not be explaining how DNS cache poisoning works. For more information, you may read the articles linked in the “More Reading” section at the end of this post.
Tools Used
- Windows VM
- Kali VM
- Ettercap
- Text editor
You will also need root/system privileges or sudo abilities on the attacking machine.
Practical Demonstration
- Find the IP address of your attacker machine
Since I’m doing this on my LAN, I can use my private IPv4 address, which I truncated from the ifconfig command for the purpose of this demonstration.
 2. Create the landing page of your malicious website
Now, we’ll prepare the HTML file that the victim will encounter once the DNS has been spoofed. Since I’m using an Apache webserver, I’ll place the file in the root directory on my machine, which is /var/www/html. This is my file:
┌──(ally㉿kali)-[/var/www/html]
└─$ cat index.html
<title>No More Planting Trees</title>

<h1>No More Planting Trees</h1>

<h3>YouR CaR's ExteNDeD WarraNTy is AlMosT OuT</h3>
<p>Give me all your PII NOW or else your identity will be stolen !!! !!</p>
<form>

 <label for="cc">Enter YouR CreDIT CarD Number ASAP <b>ASAP</b> !!:</label>
 <input id="cc" placeholder="or else" />
</form>
I then changed the ownership of the file to the service account www-data.
$ sudo chown www-data ./index.html
- Start Malicious Web Server
As stated previously, I’m using Apache, so I just started theapache2 service.
 When I visit
 [http://127.0.0.1/index.html](http://127.0.0.1/index.html,), I see my malicious webpage.
 No one would actually enter their credit card number here… right??
- Verify Website is Reachable from Victim Computer
This is pretty simple. I just visit my Kali IPv4 address in the browser of Windy Runner (my VM) to verify that it can be loaded from the Windows machine.
 As we can see here, I am able to access the webpage. Now we can get to the fun stuff.
- Configuring Ettercap
Quick Theory
Ettercap is being used in this context to resolve DNS queries coming from the victim machine. Ettercap will respond to the DNS query with the IP address of the attacking machine (Kali) such that when the victim visits the target domain, they will be redirected to the attacker’s IP address instead of the real IP address associated with the domain name.
Editing etter.conf
Open up your text editor of choice.
$ sudo vim etter.conf
The changes to make are shown in green in the screenshot below.
 Explanation: I set the UID and GID to 0 so that Ettercap has adequate permissions on the machine. In this case, UID and GID 0 are root permissions. I then uncommented lines 179, 180, 183, and 184. The purpose of the
 redir_commands is explained best in the etter.conf man page:
[P]rovide[s] a valid command (or script) to enable tcp redirection at kernel level in order to be able to use SSL dissection.
Editing etter.dns
Assuming you’re using the default configuration file for etter.dns, all you need to do is skip to the bottom of the file and add the domain name you intend to spoof, the associated A and PTR records, and your attacking IP address.
$ sudo vim /etc/ettercap/etter.dns
 6. Get the IP Address of the Victim Machine
I use ipconfig to get the IPv4 address of the Windows VM.
 7. Run Ettercap
On my Kali machine, I navigate to Applications > 09 — Sniffing & Spoofing > ettercap-graphical in order to open the ettercap GUI.
 In the upper-right hand corner, I click on the three dots and navigate to Targets > Select targets.
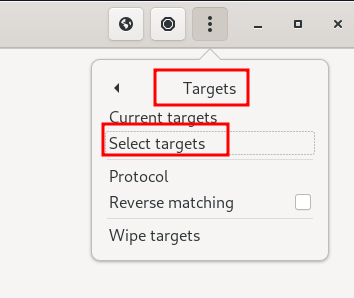 I have white theme right now, don’t judge
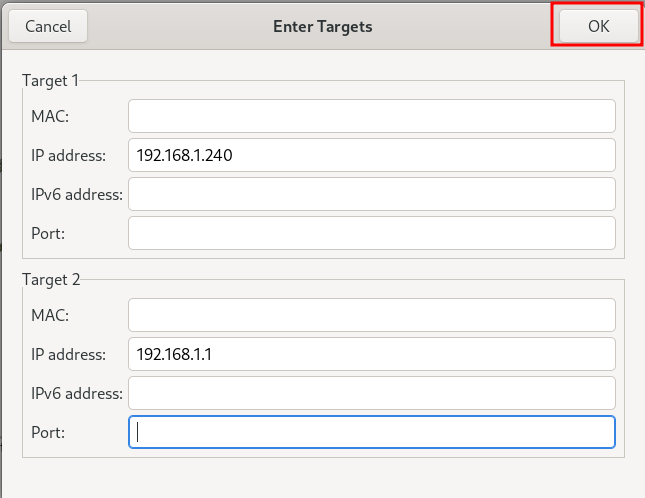
I then enter the IP address of the victim machine and default gateway and press “OK”. The default gateway can also be found in the ifconfig/ipconfig command output of the victim machine.
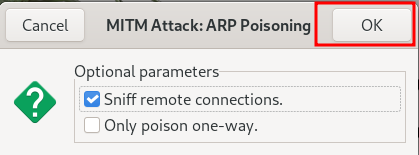
 Click the Earth icon in the upper right-hand corner and select ARP poisoning.
 The default setting is okay here.
 Then, click the three dots in the corner again. Go to Plugins > Manage plugins.
 Select
 dns_spoof by double-clicking it. You’ll know that you’ve applied the plugin when the asterisk appears to the left of the plugin name.
 8. Visit The Domain on the Victim Machine
Now, we reap the fruits of our labor.
Before
This is the webpage that the victim to see when visiting ecosia.org:
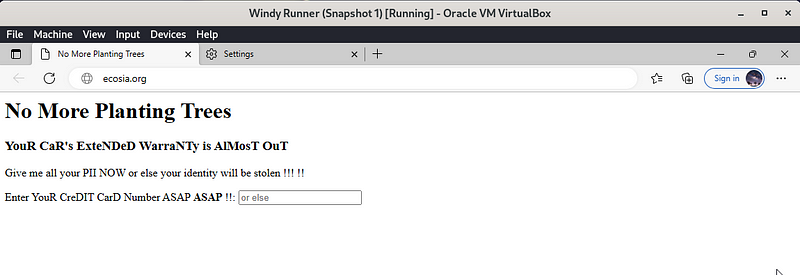
 After
After
This is the webpage that the victim machine sees when visiting ecosia.org:
 Remediation
Here are some ways to prevent a DNS Cache Poisoning attack (referenced from here).
- Use spoofing detection tools
- Have a strong DNS, DHCP, and IPAM (DDI) strategy in place
- Use Domain Name System Security Extensions (DNSSEC). This essentially adds different levels of verification
- Use end-to-end encryption for DNS queries
More Reading
- https://cybersecurity.att.com/blogs/security-essentials/dns-poisoning
- https://kinsta.com/blog/dns-poisoning/
Thanks for reading!